This is a handy PHP expression that will dynamically rescale your product images and display them in their new size. This resizing happens on the desktop PC, and the new files will be uploaded to the store with the other image files. The names of the new image files will all start with 't_'.
In order for it to work, your current images must be in *.jpg format.
INSTALLATION
1. In your site folder (usually called 'Site1') create a sub-folder called "Thumbnails".
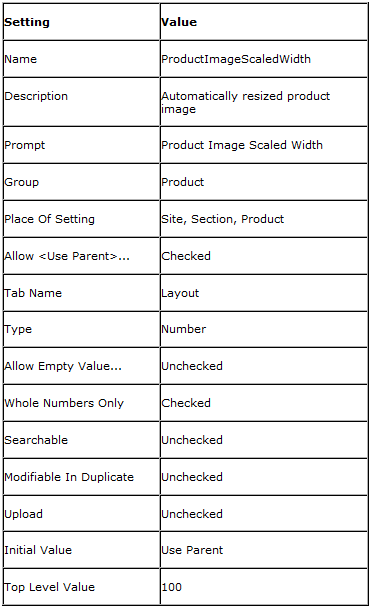
2. Go to 'Design | Library | Variables' and expand the 'Product' group.
3. Right-click on 'Product' and choose 'New Variable'.
4. Set the new variable as follows:

5. Go to 'Design | Library | Layouts' and expand the 'Product Image' group.
6. Right-click "Standard Product Image" and select Copy.
7. Rename that copy variable to be "Thumbnail Product Image".
8. Open layout "Thumbnail Product Image".
9. Replace the entire contents of that layout with the following:
<actinic:block if="%3cactinic%3avariable%20name%3d%22IsPopUpDisplayedByImage%22%20%2f%3e">
<actinic:block if="%3cactinic%3avariable%20name%3d%22ExtendedInformationType%22%20%2f%3e%20%3d%3d%20%22Opens%20in%20a%20Pop%2dUp%20Window%22">
<a href="javascript:ShowPopUp('<actinic:variable name=ExtendedInfoPageEncoded />',<actinic:variable name="ExtInfoWindowWidth" />,<actinic:variable name="ExtInfoWindowHeight" />);">
</actinic:block>
<actinic:block if="%3cactinic%3avariable%20name%3d%22ExtendedInformationType%22%20%2f%3e%20%3d%3d%20%22Opens%20in%20the%20Same%20Window%22" >
<a href="<actinic:variable name="ExtendedInfoPageName" />">
</actinic:block>
</actinic:block>
<actinic:block if="%3cactinic%3avariable%20name%3d%22IsProductImageDisplayed%22%20%2f%3e">
<actinic:block php="true" >
// START Create a thumbnail image t_ProductImageFileName
$sOriginalImageName = str_replace('\\','/', '<actinic:variable name="ProductImageFileName" encoding="perl" selectable="false" />');
$nScaledWidth = <actinic:variable name="ProductImageScaledWidth" encoding="perl" selectable="false" />;
$sThumbImageName = 'Thumbnails/t_' . basename($sOriginalImageName);
if (file_exists($sThumbImageName)) {
echo "<img src=\"$sThumbImageName\" border=\"0\"";
echo " alt=\"<actinic:variable name="ProductName" encoding="strip"/>\" />";
} else {
$image = @imagecreatefromjpeg($sOriginalImageName); /* Attempt to open */
if (!$image)
{ /* See if it failed */
echo "<br><font color=red>Thumbnail creation error opening: $sOriginalImageName </font>";
}
else
{
// Get new dimensions
$width = imagesx($image);
$height = imagesy($image);
$t_width = $nScaledWidth;
$t_height = round($height * ($t_width / $width));
// Resample
$thumbimage = imagecreatetruecolor($t_width, $t_height);
imagecopyresampled($thumbimage, $image, 0, 0, 0, 0, $t_width, $t_height, $width, $height);
if ( ! imagejpeg($thumbimage, $sThumbImageName) )
{
echo "<font color=red>Thumbnail image creation failed: $sThumbImageName </font><br>";
}
else
{
echo "<img src=\"$sThumbImageName\" width=\"$t_width\" height=\"$t_height\" border=\"0\"";
echo " alt=\"<actinic:variable name="ProductName" encoding="strip"/>\" />";
}
}
}
// END Create a thumbnail image t_ProductImageFileName
</actinic:block>
</actinic:block>
<actinic:block if="%3cactinic%3avariable%20name%3d%22IsProductImageDisplayed%22%20%2f%3e%20%3d%3d%20False">
<img src="<actinic:variable name="DefaultProductImage" />"
border="0"
alt="<actinic:variable name="ProductName" />" />
</actinic:block>
<actinic:block if="%3cactinic%3avariable%20name%3d%22IsPopUpDisplayedByImage%22%20%2f%3e">
</a>
</actinic:block>
OPERATION
To select this layout, go to 'Settings | Site Options | Layout' and set Product Image Layout to "Thumbnail Product Image".
To alter the image width, go to 'Settings | Site Options | Layout' and set 'Product Image Scaled Width' as required.
NOTES
You can now use the following line to include the rescaled product images in the best seller / new products / related items / also bought lists:
<img src="Thumbnails/t_<actinic:variable name="ProductImageFileName" />" />
With grateful thanks to Norman Rouxel (http://www.drillpine.biz/) for this solution.
Disclaimer: This code was provided by an SellerDeck user via the SellerDeck Community (http://community.sellerdeck.com/) and so can't be supported by the SellerDeck Technical Support team.
In order for it to work, your current images must be in *.jpg format.
INSTALLATION
1. In your site folder (usually called 'Site1') create a sub-folder called "Thumbnails".
2. Go to 'Design | Library | Variables' and expand the 'Product' group.
3. Right-click on 'Product' and choose 'New Variable'.
4. Set the new variable as follows:
5. Go to 'Design | Library | Layouts' and expand the 'Product Image' group.
6. Right-click "Standard Product Image" and select Copy.
7. Rename that copy variable to be "Thumbnail Product Image".
8. Open layout "Thumbnail Product Image".
9. Replace the entire contents of that layout with the following:
<actinic:block if="%3cactinic%3avariable%20name%3d%22IsPopUpDisplayedByImage%22%20%2f%3e">
<actinic:block if="%3cactinic%3avariable%20name%3d%22ExtendedInformationType%22%20%2f%3e%20%3d%3d%20%22Opens%20in%20a%20Pop%2dUp%20Window%22">
<a href="javascript:ShowPopUp('<actinic:variable name=ExtendedInfoPageEncoded />',<actinic:variable name="ExtInfoWindowWidth" />,<actinic:variable name="ExtInfoWindowHeight" />);">
</actinic:block>
<actinic:block if="%3cactinic%3avariable%20name%3d%22ExtendedInformationType%22%20%2f%3e%20%3d%3d%20%22Opens%20in%20the%20Same%20Window%22" >
<a href="<actinic:variable name="ExtendedInfoPageName" />">
</actinic:block>
</actinic:block>
<actinic:block if="%3cactinic%3avariable%20name%3d%22IsProductImageDisplayed%22%20%2f%3e">
<actinic:block php="true" >
// START Create a thumbnail image t_ProductImageFileName
$sOriginalImageName = str_replace('\\','/', '<actinic:variable name="ProductImageFileName" encoding="perl" selectable="false" />');
$nScaledWidth = <actinic:variable name="ProductImageScaledWidth" encoding="perl" selectable="false" />;
$sThumbImageName = 'Thumbnails/t_' . basename($sOriginalImageName);
if (file_exists($sThumbImageName)) {
echo "<img src=\"$sThumbImageName\" border=\"0\"";
echo " alt=\"<actinic:variable name="ProductName" encoding="strip"/>\" />";
} else {
$image = @imagecreatefromjpeg($sOriginalImageName); /* Attempt to open */
if (!$image)
{ /* See if it failed */
echo "<br><font color=red>Thumbnail creation error opening: $sOriginalImageName </font>";
}
else
{
// Get new dimensions
$width = imagesx($image);
$height = imagesy($image);
$t_width = $nScaledWidth;
$t_height = round($height * ($t_width / $width));
// Resample
$thumbimage = imagecreatetruecolor($t_width, $t_height);
imagecopyresampled($thumbimage, $image, 0, 0, 0, 0, $t_width, $t_height, $width, $height);
if ( ! imagejpeg($thumbimage, $sThumbImageName) )
{
echo "<font color=red>Thumbnail image creation failed: $sThumbImageName </font><br>";
}
else
{
echo "<img src=\"$sThumbImageName\" width=\"$t_width\" height=\"$t_height\" border=\"0\"";
echo " alt=\"<actinic:variable name="ProductName" encoding="strip"/>\" />";
}
}
}
// END Create a thumbnail image t_ProductImageFileName
</actinic:block>
</actinic:block>
<actinic:block if="%3cactinic%3avariable%20name%3d%22IsProductImageDisplayed%22%20%2f%3e%20%3d%3d%20False">
<img src="<actinic:variable name="DefaultProductImage" />"
border="0"
alt="<actinic:variable name="ProductName" />" />
</actinic:block>
<actinic:block if="%3cactinic%3avariable%20name%3d%22IsPopUpDisplayedByImage%22%20%2f%3e">
</a>
</actinic:block>
OPERATION
To select this layout, go to 'Settings | Site Options | Layout' and set Product Image Layout to "Thumbnail Product Image".
To alter the image width, go to 'Settings | Site Options | Layout' and set 'Product Image Scaled Width' as required.
NOTES
You can now use the following line to include the rescaled product images in the best seller / new products / related items / also bought lists:
<img src="Thumbnails/t_<actinic:variable name="ProductImageFileName" />" />
With grateful thanks to Norman Rouxel (http://www.drillpine.biz/) for this solution.
Disclaimer: This code was provided by an SellerDeck user via the SellerDeck Community (http://community.sellerdeck.com/) and so can't be supported by the SellerDeck Technical Support team.
Comment