SellerDeck Business Plus has the ability to allow multiple users to share the same same SellerDeck data.
When you purchase license keys for multiple users, you will be given two types of license key.
* One Business Plus key � Use this to license and setup the first Business Plus installation. This needs to be set up on a PC that is kept on most of the time.
* One or more Business Plus User keys � these are used to license all the additional copies of SellerDeck that will connect in to the shared data.
Starting Business Plus For the First Time
When you install Business Plus and license it for the first time, a dialogue appears with two options:
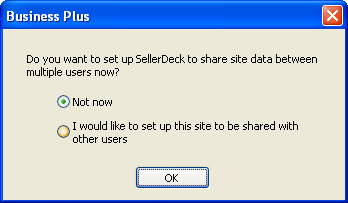
Select 'Not now' if you are just setting up a standard Business Plus installation where you don't plan to share data.
If you choose to share your site data at some point in the future, you can set this up by going to 'File | Multi-User Options' and selecting 'Share This Site's Data'.
Select 'I would like to set up this site to be shared with other users' if you would like to set up this site to be shared on your network.
Creating a Shared SellerDeck Site
When you choose to share your SellerDeck site data (either when first running SellerDeck, or when going to 'File | Multi-User Options | Share This Site's Data...') you will see the following dialogue window:
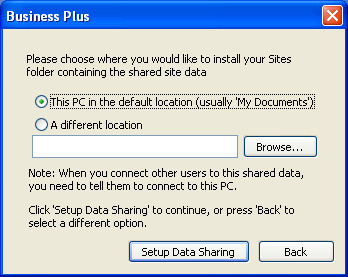
This gives you the option to move your site folder (containing all your site data) onto a different PC. This is a good idea if the different PC is a shared PC designed to perform well on a network. Click 'Browse' to select the new folder and then click 'Setup Data Sharing' to continue.
Otherwise, the site data will just stay on your current PC.
Either way, the 'synchronisation server' which actually does all the work of sharing the data, will be installed on your current PC.
The synchronisation server will run as a 'service' on your PC.
You will now be able to log into your site as an administrator. The default username and password are:
Username: Administrator
Password: Administrator
Extra users can be created via the 'Settings | Users' menu. Details of how to do this are in Multi-User Settings this article.
You can also go to 'File | Multi-User Options | Convert to Standalone Mode' to take a computer out of the shared data system.
While logged in as an administrator, if you make any changes to areas such as 'Business Settings' or 'Discounts and Surcharges Settings' that no other users will be able to do anything.
Connecting 'Business Plus User' to your shared data
When you enter a 'Business Plus User' license key into a copy of SellerDeck, you see the following dialogue window:
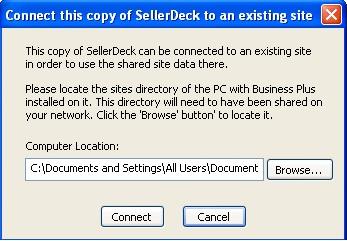
You need to locate the folder on your network that contains the site folder that was created when Business Plus was first installed. Click the 'Browse' button to find it. When you've found it, click connect.
You'll need to enter a username and password to log in.
Note: If you have trouble connecting to the shared system, it could be that the firewall on the Business Plus PC is blocking the connection. You need to edit the firewall settings on the PC to open port 4372(version 9), 4374 (version 10), 54375 (version 11) or 54377 (SellerDeck 2013) , 54381 and 54382 (SellerDeck 2014), 54385 and 54386 (SellerDeck Desktop 2016) and 54387 and 54388 (version 18)� which is the port that the 'Synchronisation Server' uses to communicate.
When you purchase license keys for multiple users, you will be given two types of license key.
* One Business Plus key � Use this to license and setup the first Business Plus installation. This needs to be set up on a PC that is kept on most of the time.
* One or more Business Plus User keys � these are used to license all the additional copies of SellerDeck that will connect in to the shared data.
Starting Business Plus For the First Time
When you install Business Plus and license it for the first time, a dialogue appears with two options:
Select 'Not now' if you are just setting up a standard Business Plus installation where you don't plan to share data.
If you choose to share your site data at some point in the future, you can set this up by going to 'File | Multi-User Options' and selecting 'Share This Site's Data'.
Select 'I would like to set up this site to be shared with other users' if you would like to set up this site to be shared on your network.
Creating a Shared SellerDeck Site
When you choose to share your SellerDeck site data (either when first running SellerDeck, or when going to 'File | Multi-User Options | Share This Site's Data...') you will see the following dialogue window:
This gives you the option to move your site folder (containing all your site data) onto a different PC. This is a good idea if the different PC is a shared PC designed to perform well on a network. Click 'Browse' to select the new folder and then click 'Setup Data Sharing' to continue.
Otherwise, the site data will just stay on your current PC.
Either way, the 'synchronisation server' which actually does all the work of sharing the data, will be installed on your current PC.
The synchronisation server will run as a 'service' on your PC.
You will now be able to log into your site as an administrator. The default username and password are:
Username: Administrator
Password: Administrator
Extra users can be created via the 'Settings | Users' menu. Details of how to do this are in Multi-User Settings this article.
You can also go to 'File | Multi-User Options | Convert to Standalone Mode' to take a computer out of the shared data system.
While logged in as an administrator, if you make any changes to areas such as 'Business Settings' or 'Discounts and Surcharges Settings' that no other users will be able to do anything.
Connecting 'Business Plus User' to your shared data
When you enter a 'Business Plus User' license key into a copy of SellerDeck, you see the following dialogue window:
You need to locate the folder on your network that contains the site folder that was created when Business Plus was first installed. Click the 'Browse' button to find it. When you've found it, click connect.
You'll need to enter a username and password to log in.
Note: If you have trouble connecting to the shared system, it could be that the firewall on the Business Plus PC is blocking the connection. You need to edit the firewall settings on the PC to open port 4372(version 9), 4374 (version 10), 54375 (version 11) or 54377 (SellerDeck 2013) , 54381 and 54382 (SellerDeck 2014), 54385 and 54386 (SellerDeck Desktop 2016) and 54387 and 54388 (version 18)� which is the port that the 'Synchronisation Server' uses to communicate.