As from the 4th of January 2011, the standard rate of VAT will increase to 20% from the current 17.5% rate.
These instructions cover both �Simple� and �Advanced� tax setups. Please note that this document refers to SellerDeck v8, v9 and v10 only. Use on earlier versions is at your own risk.
Instructions for v10 users to implement the new 20% VAT rate:
SellerDeck v10 users do not need to make any further changes within the software, your VAT change is now complete.
Instructions for v9 and v8 users to implement the new 20% VAT rate:
Invoiced orders and orders shipped before 4th January 2011 must remain at the old rate of 17.5%. To prevent accidental VAT changes to these orders you will need to take the following steps:
WARNING: Any orders edited before or without completing the following steps will have the tax rate changed incorrectly.
(Please note if your Shipping uses Standard VAT, the SQL will not fully protect your orders and the VAT on shipping will change if the order detail is edited. The default Shipping VAT is Pro-Rata.)
PLEASE NOTE: SellerDeck must be installed for the SQL runner tool to operate. Additionally SellerDeck and any plugins that might be using the database must be closed prior to running the SQL runner tool.
For Merchants using the Simple Tax Settings
Note: If you are using �Simple Tax with� �Tax Inclusive Pricing�, you may get a warning regarding �Pro Rata Shipping� is not allowed. If this is the case, switch to the �Shipping� pane, and select the level of tax you previously had applied to shipping whilst tax was in �Simple Mode�. If you had �VAT� selected whilst in �Simple Mode�, then choose �VAT 20% Rate� when switching Tax to �Advanced Mode�.
Also note that when adding your new 20% tax rate you may discover that two rates are set as default. To rectify this, select your new 20% rate as the default by left clicking in its �Default� column, then left click in the �Default� column for the tax line which is incorrectly set as default. Finally left click in the �Default� column for your new 20% rate. This will now be correctly set as the default with none of the other rates selected.
For Merchants using the Advanced Tax settings
Note: When adding your new 20% tax rate you may discover that two rates are set as default. To rectify this, select your new 20% rate as the default by left clicking in its �Default� column, and then left click in the �Default� column for the tax line which is incorrectly set as default. Finally left click in the �Default� column for your new 20% rate. This will now be correctly set as the default with none of the other rates selected.
Additional Notes for SellerDeck Enterprise SQL Users
If your store is using SellerDeck Enterprise with a SQL database, the operation of the �ActSqlRunner.exe� is slightly different. However the remainder of the instructions for both �Simple� and �Advanced� tax remain the same.
Note: If you are using SellerDeck version 10, you do not need to use the SQL runner and can ignore this section.
PLEASE NOTE: If you are using Sage accounting software you will need to transfer any outstanding orders *before* running either of the SQL queries described above.
This article is provided in good faith for the assistance of SellerDeck users. The information in it is correct to the best of our knowledge, but SellerDeck does not warrant or guarantee the information provided and cannot accept responsibility for any inaccuracy. It does not constitute general tax advice or guidance. It is your responsibility to assure yourself that your business practices conform to all mandatory regulations and requirements.
These instructions cover both �Simple� and �Advanced� tax setups. Please note that this document refers to SellerDeck v8, v9 and v10 only. Use on earlier versions is at your own risk.
Instructions for v10 users to implement the new 20% VAT rate:
- First take a Snapshot of your site and back up your SellerDeck Site folder. (�File� | �Snapshot� | �Export site�.)
- Next, go to �Settings | Business Settings� and select the �Ordering� pane. In the box �Online ordering�, tick �Suspended� and uncheck �Allowed�.
- Click �OK� and update the web site. (�Web� | �Publish to web�)
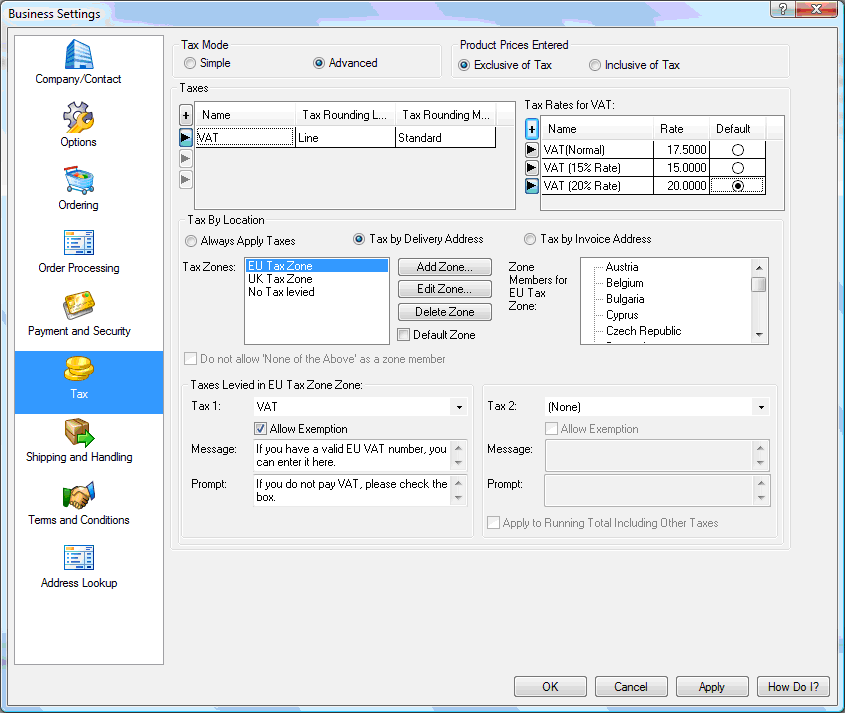
- Go to �Settings | Business settings� and select the �Tax� pane.
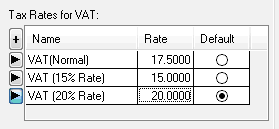
- If you are using �Advanced Tax�, locate the �Tax Rates for VAT� panel, change the original VAT rate from 17.5000 to 20, then click �OK�. If you are using �Simple Tax� follow the instructions just below the screen grab.
- If you are using �Simple Tax�, change the �Rate� field from �17.5%� to �20� and click �OK�
- At this stage you will need to update manually any Custom tax that you have set up.
- In �Settings | Business settings� and select the �Ordering� pane. In the box �Online ordering�, un-tick �Suspended�.
- Click �OK� and update the web site. (�Web� | �Publish to web�)
SellerDeck v10 users do not need to make any further changes within the software, your VAT change is now complete.
Instructions for v9 and v8 users to implement the new 20% VAT rate:
Invoiced orders and orders shipped before 4th January 2011 must remain at the old rate of 17.5%. To prevent accidental VAT changes to these orders you will need to take the following steps:
WARNING: Any orders edited before or without completing the following steps will have the tax rate changed incorrectly.
(Please note if your Shipping uses Standard VAT, the SQL will not fully protect your orders and the VAT on shipping will change if the order detail is edited. The default Shipping VAT is Pro-Rata.)
PLEASE NOTE: SellerDeck must be installed for the SQL runner tool to operate. Additionally SellerDeck and any plugins that might be using the database must be closed prior to running the SQL runner tool.
For Merchants using the Simple Tax Settings
- Download the SQL Runner tool from http://www.sellerdeck.co.uk/support-files/VAT2011.zip and then extract it to your desktop using WinZip or similar
- Create a Snapshot of your site and back up your SellerDeck Site folder. (�File� | �Snapshot� | �Export site�.)
- Suspend the store as late as possible before 4th January 2011 by going to �Settings | Business Settings� select �Ordering�, then check �Suspended� and uncheck �Allowed� under the �Online Ordering� group, apply your changes and then click �Publish to Web�
- Open �Settings | Business Settings� and select the �Tax� pane.
- Select �Advanced Tax� under the �Tax Mode� group
- Add a new Tax Rate of 20% by clicking the �+� in the �Tax Rates for VAT� panel, give it a name such as �VAT (20% Rate)�and enter �20� into the �Rate� field for the new rate that has just been added. Select it as the default.
__________________________________________________
Note: If you are using �Simple Tax with� �Tax Inclusive Pricing�, you may get a warning regarding �Pro Rata Shipping� is not allowed. If this is the case, switch to the �Shipping� pane, and select the level of tax you previously had applied to shipping whilst tax was in �Simple Mode�. If you had �VAT� selected whilst in �Simple Mode�, then choose �VAT 20% Rate� when switching Tax to �Advanced Mode�.
Also note that when adding your new 20% tax rate you may discover that two rates are set as default. To rectify this, select your new 20% rate as the default by left clicking in its �Default� column, then left click in the �Default� column for the tax line which is incorrectly set as default. Finally left click in the �Default� column for your new 20% rate. This will now be correctly set as the default with none of the other rates selected.
- Click �OK�, to save the changes, then close SellerDeck and any plugin that may be using the database
- Open ActSqlRunner.exe by double clicking on it (SellerDeck Enterprise SQL Users please see the section at the end of this article)
- Make sure the �Access Database� radio button is selected, click the ‘�� next to the �Access Database� field and browse to your SellerDeck site folder, which by default is located within �My Documents\Actinic Vx\Sites\SiteName�, and select ActinicCatalog.mdb�
- NOTE: We recommend that you do not use the ODBC function
- Click the ��� next to the �SQL File� field and locate �SimpleTax.sql�. It will be in the same folder as the �ActSqlRunner.exe�
- Click �Run SQL� to update your store database
- Open SellerDeck, then go to �Settings | Business Settings�, select the �Tax� pane, then reselect �Simple� under the �Tax Mode� group, and enter �20� into the �Rate� field. Click �OK� to close �Business Settings� and to save the changes
- Update the site by clicking �Publish to Web�
- Un-suspend the store on or after 4 January 2011 by going to �Settings | Business Settings | Ordering�, check �Allowed� and uncheck �Suspended� under the �Online Ordering� group, apply your changes and then click �Publish to Web�
For Merchants using the Advanced Tax settings
- Download the SQL Runner tool from http://www.sellerdeck.co.uk/support-files/VAT2011.zip and then extract it to your desktop using WinZip or similar
- Suspend the store as late as possible before 4 January 2011 by going to �Settings | Business Settings�, select the �Ordering� pane, then check �Suspended� and uncheck �Allowed� under the �Online Ordering� group. Click �OK� and then click �Publish to Web�
- Go to �Settings | Business Settings� and select the �Tax� pane.
- Click the �+� in the �Tax Rates for VAT� panel, give it a name such as �VAT (20%)�and enter �20� into the �Rate� field for the new rate that has just been added.
- Select this as 'Default' and click 'OK'.
Note: When adding your new 20% tax rate you may discover that two rates are set as default. To rectify this, select your new 20% rate as the default by left clicking in its �Default� column, and then left click in the �Default� column for the tax line which is incorrectly set as default. Finally left click in the �Default� column for your new 20% rate. This will now be correctly set as the default with none of the other rates selected.
- Close SellerDeck and any plugin that may be using the database.
- Open ActSqlRunner.exe by double clicking on it.
- Make sure the �Access Database� radio button is selected, click the ��� next to the �Access Database� field and browse to your SellerDeck site folder, which by default is located within �My Documents\Actinic Vx\Sites\SiteName�, and select ActinicCatalog.mdb�
- NOTE: We recommend that you do not use the ODBC function
- Click the ��� next to the �SQL File� field and locate �AdvTax.sql�. It will be in the same folder as the �ActSqlRunner.exe�
- Click �Run SQL� to update your store database
- Open SellerDeck
- Update the site by clicking �Publish to Web�
- Un-suspend the store on or after 4th January 2011 by going to �Settings | Business Settings | Ordering�, check �Allowed� and uncheck �Suspended� under the �Online Ordering� group, apply your changes and then click �Publish to Web�
Additional Notes for SellerDeck Enterprise SQL Users
If your store is using SellerDeck Enterprise with a SQL database, the operation of the �ActSqlRunner.exe� is slightly different. However the remainder of the instructions for both �Simple� and �Advanced� tax remain the same.
- Make sure SellerDeck and any plugin that uses the database, is closed and you have taken both a snapshot, and you have backed up your main SellerDeck database on the SQL server
- Select the �SQL server database� radio button
- Enter the server details into the �Server Name� field
- Enter the name of your main SellerDeck database into the �Database:� field
- If you connect to your database using Windows authentication, select �Use NT Authorisation�, if not uncheck in and enter your SQL server admin Username and Password
- Next browse to the SQL File, the file you select will depend on whether your store is setup to use �Simple� or �Advanced� tax:
- 1. If using Simple Tax, browse to �SimpleTaxSQLServer.sql�
- 2. If using Advanced Tax, browse to �AdvTaxSQLServer.sql�
- Now click �Run SQL�
- Continue the process for either �Simple Tax� or �Advanced Tax� above
Note: If you are using SellerDeck version 10, you do not need to use the SQL runner and can ignore this section.
PLEASE NOTE: If you are using Sage accounting software you will need to transfer any outstanding orders *before* running either of the SQL queries described above.
This article is provided in good faith for the assistance of SellerDeck users. The information in it is correct to the best of our knowledge, but SellerDeck does not warrant or guarantee the information provided and cannot accept responsibility for any inaccuracy. It does not constitute general tax advice or guidance. It is your responsibility to assure yourself that your business practices conform to all mandatory regulations and requirements.