If you are using PROTX (now known as 'Sage Pay') as a Payment Service Provider prior to version 9.0.4 you will need to do the following:
When registering with Sage Pay (previously known as 'Protx') make sure that you let them know you are using SellerDeck software. They should then provide you with a Merchant ID, Secret Key and an Encryption Password.
Setting up your SellerDeck cart
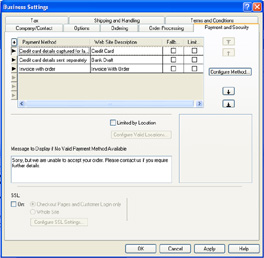
1. Within SellerDeck, select the 'Payment and Security' tab within 'Business Settings'. The 'Business Settings' are accessed from the 'Settings' menu in Actinic v8 and above, and the 'View' menu in Actinic v7 and earlier.
2. To add a new payment method click the + icon in the top left-hand corner of the grid.
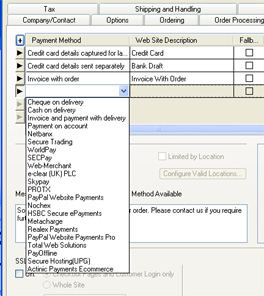
3. Select Protx from the drop-down menu.
4. Click the 'Configure Method' button, enter your 'Merchant ID' and 'Secret Key '(re-enter your Secret Key in the 'Confirm Key' field), and click 'OK'. Then click 'OK' again.
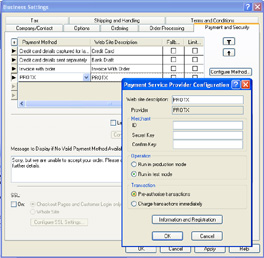
5. Leave the 'Operation' set to 'Run in test mode' so that you can try placing test orders online to make sure it works and that you are happy with it. This means that no money will be deducted from credit cards used while Sage Pay/Protx is in 'test mode'.
Entering your Sage Pay (Protx) Encryption Password
PLEASE NOTE: If you are using v9.0.4 or later versions, this is no longer required as the encryption password can be entered directly into the software.
For SellerDeck Installations with a Single Site:
1. To enter your encryption password please go to the 'OCCUpgrade' directory which can be found at 'C:\Program Files\Actinic v7/8/9'. Within this directory you will find a folder called 'CommonOCC'.
2. Find the file called 'OCCProtxScriptTemplate.pl' and open it with text editing software, such as 'Notepad'.
3. Once you have opened this file, look for the following lines:
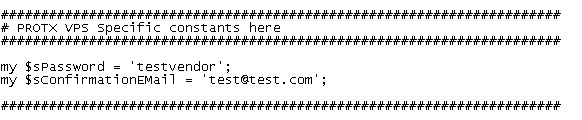
Replace 'testvendor' with your own 'Encryption Password'.
If you wish to receive e-mails from Protx when a transaction is completed, cancelled, not authorised etc. then enter your e-mail address in the '$sConfirmationEMail' field - if you don't want them, leave it blank.
4. The final step is to change the version number in the 'OCCUpgrade.ini' file, found in the 'OCCUpgrade' directory ('C:\Program Files\Actinic v7/8/9'). In some versions of windows the file is only displayed as 'OCCUpgrade', but you can check by looking at the properties. Open it in a text editor.
At the top of this file you will see the following text:
[Version]
Number=1045 (for example)
Increment this Number by 1 (so if it was 1045, you will need to change the value to 1046) and save the file.
5. You should now close down SellerDeck and open it again. When you open SellerDeck again, you will see a message to say your payment service providers have been updated. You should accept this change and then continue. The effect of this is to copy the amended 'OCCProtxScriptTemplate.pl' file into your 'Site1\CommonOCC' folder.
6. Once you have entered all the appropriate information you will need to re-upload your modified web site to your web server. This will then enable you to carry out test transactions against the Protx payment gateway.
7. When you are happy with how the integration works, you can go back into the 'Business Settings | Payment & Security tab', highlight 'Protx' in your list of payment methods and click the 'Configure Method' button. Set the 'Operation' to 'Run in production mode' and click 'OK' and 'OK' again and then update your site again.
For SellerDeck Installations with Multiple Sites:
The instructions are similar to above, however, you should add your Encryption Password into the 'OCCProtxScriptTemplate.pl' file that is in the 'CommonOCC' folder in your site folder (rather than the 'OCCUpgrade\CommonOCC' folder). You also do not need to increment the version number in the OCCUpgrade.ini file. This is because each site will probably have its own Protx account and therefore the encryption password will be different for each site.
All users please note: if you upgrade your software you will have to re-apply the script changes to the new version 'OCCProtxScriptTemplate.pl' file
When registering with Sage Pay (previously known as 'Protx') make sure that you let them know you are using SellerDeck software. They should then provide you with a Merchant ID, Secret Key and an Encryption Password.
Setting up your SellerDeck cart
1. Within SellerDeck, select the 'Payment and Security' tab within 'Business Settings'. The 'Business Settings' are accessed from the 'Settings' menu in Actinic v8 and above, and the 'View' menu in Actinic v7 and earlier.
2. To add a new payment method click the + icon in the top left-hand corner of the grid.
3. Select Protx from the drop-down menu.
4. Click the 'Configure Method' button, enter your 'Merchant ID' and 'Secret Key '(re-enter your Secret Key in the 'Confirm Key' field), and click 'OK'. Then click 'OK' again.
5. Leave the 'Operation' set to 'Run in test mode' so that you can try placing test orders online to make sure it works and that you are happy with it. This means that no money will be deducted from credit cards used while Sage Pay/Protx is in 'test mode'.
Entering your Sage Pay (Protx) Encryption Password
PLEASE NOTE: If you are using v9.0.4 or later versions, this is no longer required as the encryption password can be entered directly into the software.
For SellerDeck Installations with a Single Site:
1. To enter your encryption password please go to the 'OCCUpgrade' directory which can be found at 'C:\Program Files\Actinic v7/8/9'. Within this directory you will find a folder called 'CommonOCC'.
2. Find the file called 'OCCProtxScriptTemplate.pl' and open it with text editing software, such as 'Notepad'.
3. Once you have opened this file, look for the following lines:
Replace 'testvendor' with your own 'Encryption Password'.
If you wish to receive e-mails from Protx when a transaction is completed, cancelled, not authorised etc. then enter your e-mail address in the '$sConfirmationEMail' field - if you don't want them, leave it blank.
4. The final step is to change the version number in the 'OCCUpgrade.ini' file, found in the 'OCCUpgrade' directory ('C:\Program Files\Actinic v7/8/9'). In some versions of windows the file is only displayed as 'OCCUpgrade', but you can check by looking at the properties. Open it in a text editor.
At the top of this file you will see the following text:
[Version]
Number=1045 (for example)
Increment this Number by 1 (so if it was 1045, you will need to change the value to 1046) and save the file.
5. You should now close down SellerDeck and open it again. When you open SellerDeck again, you will see a message to say your payment service providers have been updated. You should accept this change and then continue. The effect of this is to copy the amended 'OCCProtxScriptTemplate.pl' file into your 'Site1\CommonOCC' folder.
6. Once you have entered all the appropriate information you will need to re-upload your modified web site to your web server. This will then enable you to carry out test transactions against the Protx payment gateway.
7. When you are happy with how the integration works, you can go back into the 'Business Settings | Payment & Security tab', highlight 'Protx' in your list of payment methods and click the 'Configure Method' button. Set the 'Operation' to 'Run in production mode' and click 'OK' and 'OK' again and then update your site again.
For SellerDeck Installations with Multiple Sites:
The instructions are similar to above, however, you should add your Encryption Password into the 'OCCProtxScriptTemplate.pl' file that is in the 'CommonOCC' folder in your site folder (rather than the 'OCCUpgrade\CommonOCC' folder). You also do not need to increment the version number in the OCCUpgrade.ini file. This is because each site will probably have its own Protx account and therefore the encryption password will be different for each site.
All users please note: if you upgrade your software you will have to re-apply the script changes to the new version 'OCCProtxScriptTemplate.pl' file