The following settings apply for the first transfer of SellerDeck Ecommerce products over to a blank (New) Epos setup.
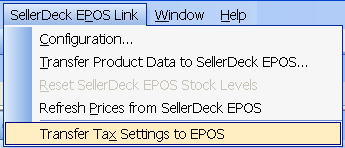
Firstly go to Business Settings\Options\Tick �SellerDeck Epos Link� Apply and Ok.
You will now see the SellerDeck Epos Link option at the top of the screen.

Configuration Tab Settings:
Transfer Product Data to SellerDeck Epos settings:
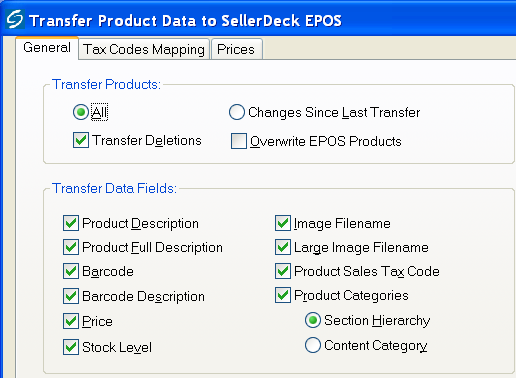
Under the �General� Tab
Under the �Tax Codes Mapping� Tab (These tax codes will need transferring to epos � SellerDeck Epos Link\Transfer Tax Settings to Epos)
Under the �Prices� Tab
All set to �Do Not Transfer� except for �Region1� which is set to �Retail�
Transfer Tax Settings to SellerDeck Epos
This will transfer the tax settings you made (Under the �Tax Codes Mapping� Tab ) above to Epos. This needs to be done before transferring over any product data from SellerDeck Ecommerce to Epos.
Transfer Product Data to SellerDeckEpos Header
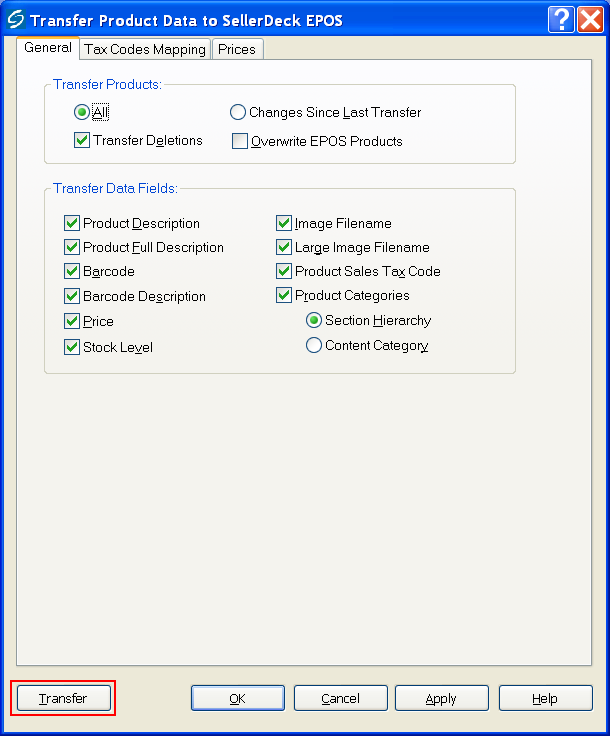
Once you�re happy with the settings you can transfer over your data by pressing �Transfer�
Transferring Orders to Epos
Important notes to consider regarding to transferring orders to Epos.
*** Tax Codes must be transferred over from SellerDeck Ecommerce to Epos first. How to do this is noted on pages 3-5 ***
*** Any orders made within EC will be shown within the �Allocated� field in Epos until the order has been �Completed� within SellerDeck Ecommerce ***
*** Only orders as of now will be transferred over to Epos ***
Firstly go to Business Settings\Options\Tick �SellerDeck Epos Link� Apply and Ok.
You will now see the SellerDeck Epos Link option at the top of the screen.
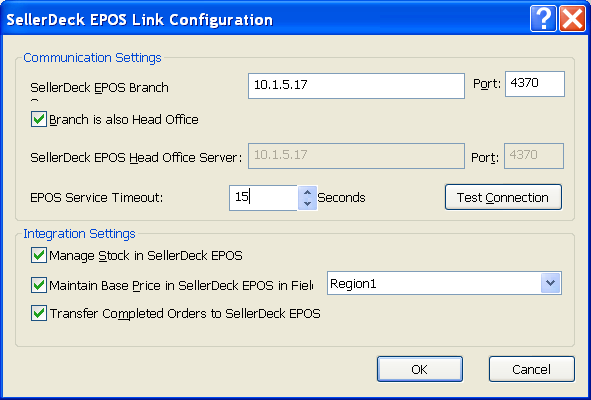
Configuration Tab Settings:
- �SellerDeck EPOS Branch Server� = IP address or Computer Name of the Epos Till which it�s connecting to. If the Epos Software is installed on the same PC then enter its own IP address or Computer Name. If the PC is Vista or Win7 then you can also use the default IP 127.0.0.1. The port number 4370 should remain the same. The IP address must be a fixed IP address.
- �Branch is also Head Office� = Enter the IP address or Computer Name of the Epos Computer ie the same details as the EPOS Branch Server.
- �Integration Settings� = Tick: �Manage Stock in SellerDeck Epos� tick �Maintain Base Price in SellerDeck Epos in Field� and select �Region 1� from the drop down box. Tick �Transfer Completed Orders to SellerDeck Epos�
Transfer Product Data to SellerDeck Epos settings:
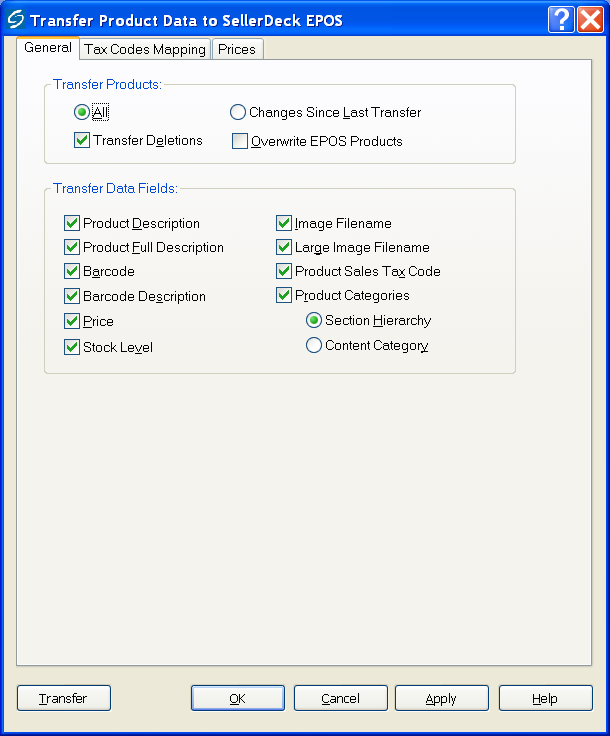
Under the �General� Tab
- �Transfer Products� = All
- �Transfer Deletions� = Ticked � Having Transferring Deletions ticked will mean it will not transfer deleted products to Epos. * Having a product �hidden� on SellerDeck Ecommerce will still transfer to Epos *
- Section Hierarchy = Selected.
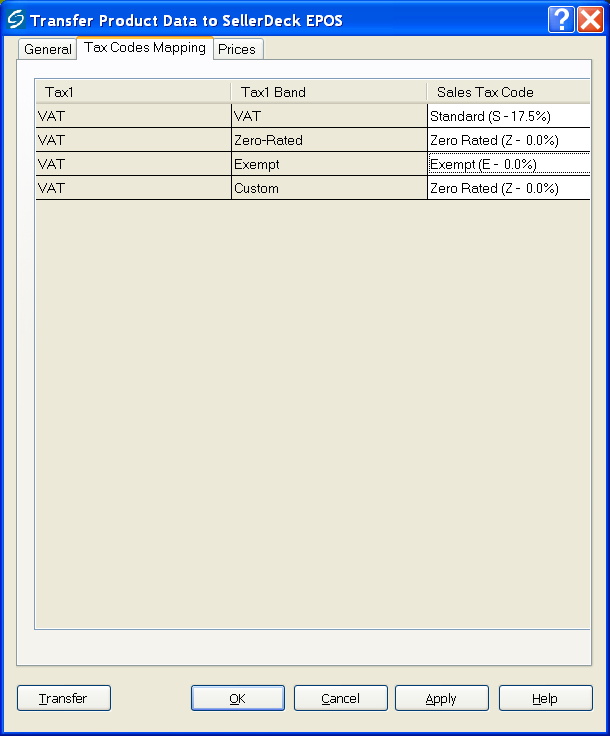
Under the �Tax Codes Mapping� Tab (These tax codes will need transferring to epos � SellerDeck Epos Link\Transfer Tax Settings to Epos)
- VAT Normal = Standard (S - 20.0%)
- Zero Rated = Zero Rated (Z � 0.0%)
- Exempt = Exempt (E � 0.0%)
- Custom = Zero Rated (Z � 0.0%)
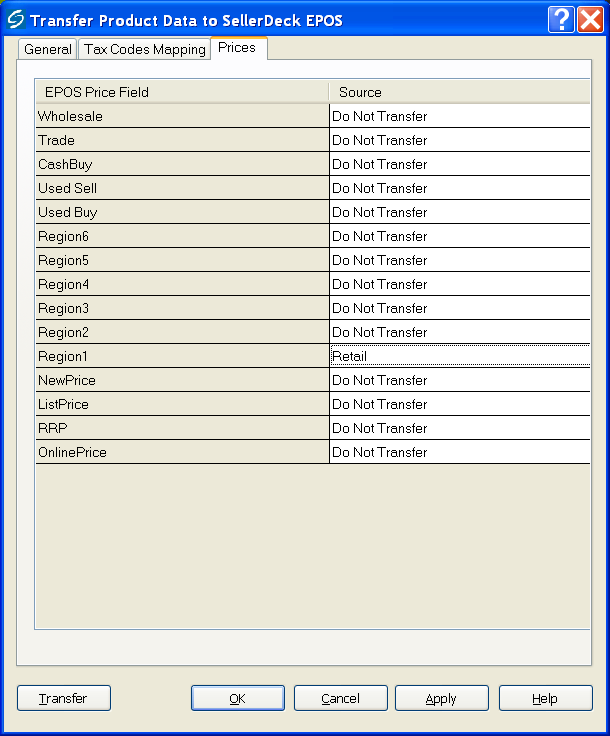
Under the �Prices� Tab
All set to �Do Not Transfer� except for �Region1� which is set to �Retail�
Transfer Tax Settings to SellerDeck Epos
This will transfer the tax settings you made (Under the �Tax Codes Mapping� Tab ) above to Epos. This needs to be done before transferring over any product data from SellerDeck Ecommerce to Epos.
Transfer Product Data to SellerDeckEpos Header
- Transfer Products All: This will transfer over all products within SellerDeck Ecommerce to Epos.
- Transfer Deletions: Having Transferring Deletions ticked will mean it will not transfer deleted products to Epos.
- Changes Since Last Transfer: This will only transfer amendments made since the last transfer, it will not transfer all.
- Overwrite Epos Products: This will only overwrite products which are within the transfer � ie if you have set up other products that are not in SellerDeck Ecommerce then these will not be overwritten.
- Product Description: This is the product name.
- Product Full Description: This will appear under the Product Details Tab\Long Description in Epos.
- Barcode: If a barcode has been entered within the product general outlay then this will get transferred over. Barcode Description: This needs to be selected if a barcode is to be transferred.
- Price: This needs to be ticked in order to transfer over the price.
- Stock Level: This transfers over the current stock level set in SellerDeck Ecommerce.
- Image File Name: Once transferred, the image path will show in Epos\Products\Details.
Once you�re happy with the settings you can transfer over your data by pressing �Transfer�
Transferring Orders to Epos
Important notes to consider regarding to transferring orders to Epos.
*** Tax Codes must be transferred over from SellerDeck Ecommerce to Epos first. How to do this is noted on pages 3-5 ***
*** Any orders made within EC will be shown within the �Allocated� field in Epos until the order has been �Completed� within SellerDeck Ecommerce ***
*** Only orders as of now will be transferred over to Epos ***