It is possible to display an image against each radio button choice.
This change will include a new field for your choices called 'Image', and whatever image you specify there will be displayed next to the radio button for that choice in the web page.
To begin, go to 'Design | Library | Variables'. Then right click on the 'Choices' group and select 'New Variable'.
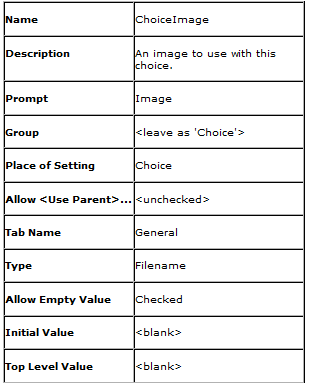
Use the following settings for the new variable:

Then click 'OK' and change to the 'Layouts' tab of the library.
Open the 'Choices' layout group and and double-click on the layout called 'Radio Button Choice'. Replace all the code with the following:
<input type="radio" name="<Actinic:Variable Name="UIWidgetName"/>" value="<Actinic:Variable Name="ChoiceSelectedValue"/>"<actinic:block if="%3cactinic%3avariable%20name%3d%22ListIndex%22%20%2f%3e%20%3d%3d%201">checked="checked"</actinic:block> />
<Actinic:Variable Name="ChoiceDisplayLabel"/><actinic:block php="true">
$choiceimage = '<Actinic:Variable Name="ChoiceImage" encoding="perl" selectable="false" />';
if ( $choiceimage )
{
list($width, $height, $type, $attr) = getimagesize($choiceimage);
if ( $width )
{
echo " <img src=\"$choiceimage\" width=\"$width\" height=\"$height\" />";
}
else
{
echo "<font color=\"red\"><b> BAD IMAGE</b></font>";
}
}
</actinic:block>
Click 'OK' and close the Library, and that's it.
Your 'Choice Details' dialogue should now have a new entry ' Image', where you can browse for an image to add to this choice.
Disclaimer: This code was provided by an SellerDeck user via the SellerDeck Community (http://community.sellerdeck.com/) and so can't be supported by the SellerDeck Technical Support team.
This change will include a new field for your choices called 'Image', and whatever image you specify there will be displayed next to the radio button for that choice in the web page.
To begin, go to 'Design | Library | Variables'. Then right click on the 'Choices' group and select 'New Variable'.
Use the following settings for the new variable:
Then click 'OK' and change to the 'Layouts' tab of the library.
Open the 'Choices' layout group and and double-click on the layout called 'Radio Button Choice'. Replace all the code with the following:
<input type="radio" name="<Actinic:Variable Name="UIWidgetName"/>" value="<Actinic:Variable Name="ChoiceSelectedValue"/>"<actinic:block if="%3cactinic%3avariable%20name%3d%22ListIndex%22%20%2f%3e%20%3d%3d%201">checked="checked"</actinic:block> />
<Actinic:Variable Name="ChoiceDisplayLabel"/><actinic:block php="true">
$choiceimage = '<Actinic:Variable Name="ChoiceImage" encoding="perl" selectable="false" />';
if ( $choiceimage )
{
list($width, $height, $type, $attr) = getimagesize($choiceimage);
if ( $width )
{
echo " <img src=\"$choiceimage\" width=\"$width\" height=\"$height\" />";
}
else
{
echo "<font color=\"red\"><b> BAD IMAGE</b></font>";
}
}
</actinic:block>
Click 'OK' and close the Library, and that's it.
Your 'Choice Details' dialogue should now have a new entry ' Image', where you can browse for an image to add to this choice.
Disclaimer: This code was provided by an SellerDeck user via the SellerDeck Community (http://community.sellerdeck.com/) and so can't be supported by the SellerDeck Technical Support team.