Website Payments Pro Setup Guide
Fields in SellerDeck and their values
Vendor: Partner ID you have received with your PayPal Manager Credentials. If you purchased your account directly from PayPal, use PayPalUK.
Merchant: Vendor name you have received with your PayPal Manager Credentials.
User: User name you have received with your PayPal Manager Credentials if there are multiple users on the account. If only one user, use vendor name here as well.
Password: The 6- to 32-character password that you defined while registering with PayPal Manager.
With Website Payments Pro, you get the payment processing capabilities of a merchant account and gateway � plus much more. It is an all-in-one payment solution that includes:
* Direct Payment. Direct Payment enables you to accept credit card payments directly on your website. PayPal remains invisible, so you control the customer experience.
* Express Checkout. Express Checkout allows PayPal account holders to check out fast with saved information, and enables you to gain incremental sales from PayPal�s growing base of users.
How Website Payments Pro Works
Website Payments Pro has the flexibility to work with your unique checkout process, whether it is one page or has multiple steps.
After selecting products to purchase, your customer chooses whether they want to pay using PayPal or pay using credit cards directly on your website. If your customer pays using credit cards on your website, PayPal processes them in the background.
If your customer chooses to use PayPal, your customer is transferred to PayPal to log in and select a postal address and payment method, and is returned to your website to complete their purchase.
Once the buyer completes their order, you receive your payment.
Direct Payment Overview
Direct Payment offers you direct credit card payment processing capability through PayPal. For credit card transactions, customers can stay on your website as PayPal processes the payment in the background.
For each payment, Direct Payment takes the billing address, transaction amount, credit card information and item information as inputs. Within seconds, PayPal returns a confirmation that the transaction has been processed. If you have signed up for Fraud Protection Services, Direct Payment lets you flag potentially fraudulent transactions, and provides you with industry-standard Address Verification Service and card security code (CVV2) responses for each transaction.
IMPORTANT: Direct Payment is not a standalone product. You are required to use Direct Payment and Express Checkout together as part of the Website Payments Pro solution. See �Business Rules� further down..
Direct Payment is not covered by the PayPal Seller Protection Policy (SPP).
Express Checkout Overview
With Express Checkout, a customer selects their products and completes their orders on your website. Payment method along with postage and billing details are managed on PayPal�s website.
PayPal automatically gives you the postal address and other customer information to make it more convenient for your customers to buy from you. Express Checkout allows customers the option to pay quickly through PayPal and gives your business account the credit.
Express Checkout provides these advantages to your customers:
* Gives buyers more convenience, and gets more sales. Since your customers simply log in to use information they've already entered with PayPal, they save time by completing transactions in fewer steps.
* Helps buyers feel safer, so they buy more. Buyers prefer to pay with PayPal because their customer information is kept safe.
With this design, you have these advantages:
* Real time notification of successful payments
* Automation of your internal business processes.
* More advertising opportunities as buyers finish their orders on your website.
* Notification that the buyer's address is confirmed.
* Eligibility for coverage under PayPal�s Seller Protection Policy.
What Is Express Checkout?
Express Checkout offers your customers an easy, convenient checkout experience. It lets them use postage and billing information stored securely at PayPal to check out, so they don�t have to re-enter it on your site.
From the perspective of web site development, Express Checkout works like other Website Payments Pro features. You submit transaction information to the server as name-value pair parameter strings.
How Express Checkout Works
The PayPal logo is used by the customer to choose PayPal as their method of payment. Express Checkout gives you the flexibility to put this PayPal button graphic first in your checkout process�or on your billing page with other payment options.
The steps involved are described below:
1. On your website when your customer chooses to pay with PayPal, you submit a Set Express Checkout request.
2. The server sends back a token, a string value to track your customer throughout the checkout process.
3. You direct your customer to the PayPal site, where they log in, select a funding source, and confirm contact and postal information. Express Checkout includes parameters that you can use to customise the PayPal pages so they match characteristics of your own website. For example, you can provide your own logo and colors.
4. When your customer clicks the �Continue� button, PayPal sends them back to your site at the return URL you specified in the Set Express Checkout request. The token is appended to the URL to identify the customer.
5. Optionally, you can send the Get Express Checkout Details request to obtain details about your customer, such as the customer�s telephone number and postage address. You send the token to identify the customer. The server returns the requested information.
6. When your customer clicks the �Pay� button, you submit the Do Express Checkout Payment request to perform the actual payment transaction. The server returns the transaction result.
Business Rules
Website Payments Pro must be integrated on your website in the following ways. You must:
1. Present the PayPal Express Checkout button and associated messaging before requesting postal address, billing address, and financial information. PayPal account holders should not be required to enter any of this information on your website, because the information is available from their PayPal accounts.
2. Display PayPal as an option together with other payment methods, wherever other payment methods are offered.
3. Present the PayPal mark graphic wherever other payment marks are displayed.
SSL with Paypal Pro
SSL is not mandatory with Paypal Express Checkout, however it is necessary for Paypal Direct Debit because it makes you capture credit card details on your site so you should use SSL (Actinic shared SSL, or an SSL cert) to be secure. As they come in a bundle SSL is required.
~~~~~~~~~~~~~~~~~~~
How to configure callbacks on PayPal : ( this is for both 'PayPal Website Payments' and for 'PayPal Website Payments Pro') - Version : 8.5.1
On the Merchant interface (logged in to www.paypal.com)
- go to 'Edit profile | Website payment preferences | Auto Return' and set to 'off'.
- Open the {Site Dir}\CommonOCC\OCCPayPalTemplate.pl with a text editor like notepad
- After line:
AddPostValues ('&', 'bn', 'ActinicCat_Cart_ST', $ALWAYS, $NOENCODE); # hard code the provider
- insert the following line:
AddPostValues ('&', 'rm', '2', $ALWAYS, $NOENCODE); # Set form send method to POST
- save the file and exit editor
'Upload' for your site and PayPal should now be properly configured.
~~~~~~~~~~~~~~~~~~~
How to configure callbacks on PayPal : ( this is for both 'PayPal Website Payments' and for 'PayPal Website Payments Pro') - Version : 8.5.0 and earlier
On the Merchant interface (logged in to www.paypal.com)
- go to 'Edit profile | Website payment preferences | Auto Return' and set to 'off'.
- Open the {Site Dir}\CommonOCC\OCCPayPalTemplate.pl with a text editor like notepad
- After line:
AddPostValues ('&', 'bn', 'SureSolutions.Actinic', $ALWAYS, $NOENCODE); # hard code the provider
- insert the following line:
AddPostValues ('&', 'rm', '2', $ALWAYS, $NOENCODE); # Set form send method to POST
- save the file and exit editor
'Upload' for your site and PayPal should now be properly configured.
Notes regarding the integration:
* PayPal requires an ISO code to be passed over to them for the country and states fields. This works for the United States as there are ISO codes for each state, however, there are no such codes for regions of the United Kingdom. This means that you cannot use PayPal Pro if you want to set up your shipping by areas of the UK (ie Mainland UK, Scottish Highlands & Islands etc) as you may find problems using the Express Checkout part of PayPal Pro.
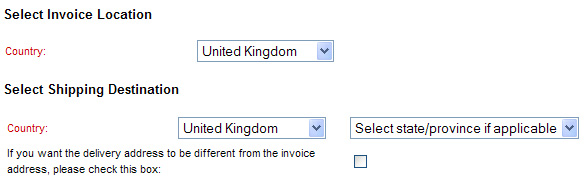
* If you allow customers to have goods shipped to a location different to the invoice address then you must set your 'Tax by Location' basis to 'Tax by invoice address' (Business Settings | Tax):

This means that you will have drop-down boxes for both the invoice address and delivery address countries on the first checkout page and in turn this will convert the country selected from the list to the correct ISO code when passed to Paypal:
Fields in SellerDeck and their values
Vendor: Partner ID you have received with your PayPal Manager Credentials. If you purchased your account directly from PayPal, use PayPalUK.
Merchant: Vendor name you have received with your PayPal Manager Credentials.
User: User name you have received with your PayPal Manager Credentials if there are multiple users on the account. If only one user, use vendor name here as well.
Password: The 6- to 32-character password that you defined while registering with PayPal Manager.
With Website Payments Pro, you get the payment processing capabilities of a merchant account and gateway � plus much more. It is an all-in-one payment solution that includes:
* Direct Payment. Direct Payment enables you to accept credit card payments directly on your website. PayPal remains invisible, so you control the customer experience.
* Express Checkout. Express Checkout allows PayPal account holders to check out fast with saved information, and enables you to gain incremental sales from PayPal�s growing base of users.
How Website Payments Pro Works
Website Payments Pro has the flexibility to work with your unique checkout process, whether it is one page or has multiple steps.
After selecting products to purchase, your customer chooses whether they want to pay using PayPal or pay using credit cards directly on your website. If your customer pays using credit cards on your website, PayPal processes them in the background.
If your customer chooses to use PayPal, your customer is transferred to PayPal to log in and select a postal address and payment method, and is returned to your website to complete their purchase.
Once the buyer completes their order, you receive your payment.
Direct Payment Overview
Direct Payment offers you direct credit card payment processing capability through PayPal. For credit card transactions, customers can stay on your website as PayPal processes the payment in the background.
For each payment, Direct Payment takes the billing address, transaction amount, credit card information and item information as inputs. Within seconds, PayPal returns a confirmation that the transaction has been processed. If you have signed up for Fraud Protection Services, Direct Payment lets you flag potentially fraudulent transactions, and provides you with industry-standard Address Verification Service and card security code (CVV2) responses for each transaction.
IMPORTANT: Direct Payment is not a standalone product. You are required to use Direct Payment and Express Checkout together as part of the Website Payments Pro solution. See �Business Rules� further down..
Direct Payment is not covered by the PayPal Seller Protection Policy (SPP).
Express Checkout Overview
With Express Checkout, a customer selects their products and completes their orders on your website. Payment method along with postage and billing details are managed on PayPal�s website.
PayPal automatically gives you the postal address and other customer information to make it more convenient for your customers to buy from you. Express Checkout allows customers the option to pay quickly through PayPal and gives your business account the credit.
Express Checkout provides these advantages to your customers:
* Gives buyers more convenience, and gets more sales. Since your customers simply log in to use information they've already entered with PayPal, they save time by completing transactions in fewer steps.
* Helps buyers feel safer, so they buy more. Buyers prefer to pay with PayPal because their customer information is kept safe.
With this design, you have these advantages:
* Real time notification of successful payments
* Automation of your internal business processes.
* More advertising opportunities as buyers finish their orders on your website.
* Notification that the buyer's address is confirmed.
* Eligibility for coverage under PayPal�s Seller Protection Policy.
What Is Express Checkout?
Express Checkout offers your customers an easy, convenient checkout experience. It lets them use postage and billing information stored securely at PayPal to check out, so they don�t have to re-enter it on your site.
From the perspective of web site development, Express Checkout works like other Website Payments Pro features. You submit transaction information to the server as name-value pair parameter strings.
How Express Checkout Works
The PayPal logo is used by the customer to choose PayPal as their method of payment. Express Checkout gives you the flexibility to put this PayPal button graphic first in your checkout process�or on your billing page with other payment options.
The steps involved are described below:
1. On your website when your customer chooses to pay with PayPal, you submit a Set Express Checkout request.
2. The server sends back a token, a string value to track your customer throughout the checkout process.
3. You direct your customer to the PayPal site, where they log in, select a funding source, and confirm contact and postal information. Express Checkout includes parameters that you can use to customise the PayPal pages so they match characteristics of your own website. For example, you can provide your own logo and colors.
4. When your customer clicks the �Continue� button, PayPal sends them back to your site at the return URL you specified in the Set Express Checkout request. The token is appended to the URL to identify the customer.
5. Optionally, you can send the Get Express Checkout Details request to obtain details about your customer, such as the customer�s telephone number and postage address. You send the token to identify the customer. The server returns the requested information.
6. When your customer clicks the �Pay� button, you submit the Do Express Checkout Payment request to perform the actual payment transaction. The server returns the transaction result.
Business Rules
Website Payments Pro must be integrated on your website in the following ways. You must:
1. Present the PayPal Express Checkout button and associated messaging before requesting postal address, billing address, and financial information. PayPal account holders should not be required to enter any of this information on your website, because the information is available from their PayPal accounts.
2. Display PayPal as an option together with other payment methods, wherever other payment methods are offered.
3. Present the PayPal mark graphic wherever other payment marks are displayed.
SSL with Paypal Pro
SSL is not mandatory with Paypal Express Checkout, however it is necessary for Paypal Direct Debit because it makes you capture credit card details on your site so you should use SSL (Actinic shared SSL, or an SSL cert) to be secure. As they come in a bundle SSL is required.
~~~~~~~~~~~~~~~~~~~
How to configure callbacks on PayPal : ( this is for both 'PayPal Website Payments' and for 'PayPal Website Payments Pro') - Version : 8.5.1
On the Merchant interface (logged in to www.paypal.com)
- go to 'Edit profile | Website payment preferences | Auto Return' and set to 'off'.
- Open the {Site Dir}\CommonOCC\OCCPayPalTemplate.pl with a text editor like notepad
- After line:
AddPostValues ('&', 'bn', 'ActinicCat_Cart_ST', $ALWAYS, $NOENCODE); # hard code the provider
- insert the following line:
AddPostValues ('&', 'rm', '2', $ALWAYS, $NOENCODE); # Set form send method to POST
- save the file and exit editor
'Upload' for your site and PayPal should now be properly configured.
~~~~~~~~~~~~~~~~~~~
How to configure callbacks on PayPal : ( this is for both 'PayPal Website Payments' and for 'PayPal Website Payments Pro') - Version : 8.5.0 and earlier
On the Merchant interface (logged in to www.paypal.com)
- go to 'Edit profile | Website payment preferences | Auto Return' and set to 'off'.
- Open the {Site Dir}\CommonOCC\OCCPayPalTemplate.pl with a text editor like notepad
- After line:
AddPostValues ('&', 'bn', 'SureSolutions.Actinic', $ALWAYS, $NOENCODE); # hard code the provider
- insert the following line:
AddPostValues ('&', 'rm', '2', $ALWAYS, $NOENCODE); # Set form send method to POST
- save the file and exit editor
'Upload' for your site and PayPal should now be properly configured.
Notes regarding the integration:
* PayPal requires an ISO code to be passed over to them for the country and states fields. This works for the United States as there are ISO codes for each state, however, there are no such codes for regions of the United Kingdom. This means that you cannot use PayPal Pro if you want to set up your shipping by areas of the UK (ie Mainland UK, Scottish Highlands & Islands etc) as you may find problems using the Express Checkout part of PayPal Pro.
* If you allow customers to have goods shipped to a location different to the invoice address then you must set your 'Tax by Location' basis to 'Tax by invoice address' (Business Settings | Tax):
This means that you will have drop-down boxes for both the invoice address and delivery address countries on the first checkout page and in turn this will convert the country selected from the list to the correct ISO code when passed to Paypal: