This guide covers the hardware recommended by SellerDeck Software for the following systems:
* PC Upgrade till system
* Entry-level PC till system
You should have the items shown in the following picture:
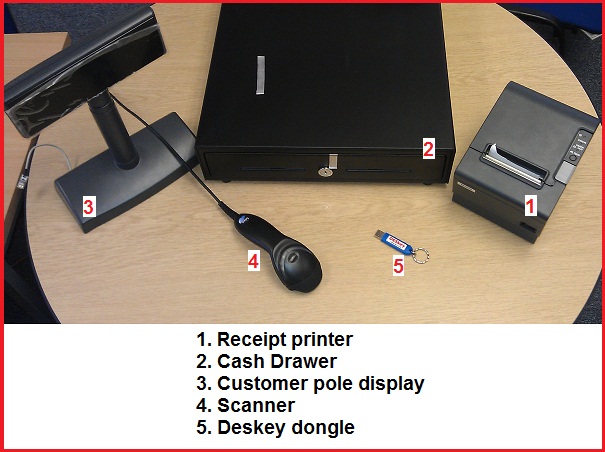
For other EPOS hardware please consult the manufacturer�s literature for installation instructions.
Please note that this guide is for illustrative purposes only, location of connectors may vary. Please refer to manufacturer�s instructions for full details.
Do not connect any hardware to the mains until all the connections have been made.
Connecting the Pole Display
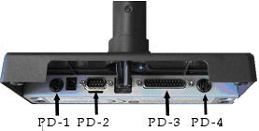
1. Connect the large end of one of the RS-232 cables � RS-1 to the matching connector on the pole display marked PD-3.
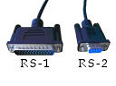
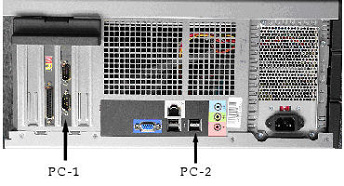
2. Connect the small end of the same RS-232 cables - RS-2 to the com port on the marked as PC-1 on the PC.
3. Connect the end of the power cable marked P-1 to the socket marked PD-1 on the pole display � do not connect to the mains at this point.

Connecting the Receipt Printer
1. Connect the large end of the remaining RS-232, (marked as RS-1) to the matching connector on the receipt printer shown as RP-1. Connect the small end of the same RS-232 cable marked as RS-2 to port PD-2 on the pole display.
2. Connect one end of the round power cable connector to the matching connector on the receipt printer, shown as RP-3.
3. Connect the other end of the round power cable to PD-4 on the pole display.
Connecting the Cash Drawer
1. Take the small RJ12 connector (RJ-1) from the cash drawer and connect to the port marked RP-2 on the receipt printer.
Connecting the USB �Keyboard Wedge� Scanner.
1. Connect the plug marked KS-1 from the scanner to a spare USB connector on the PC, shown as PC-2. Note there may be USB connectors located on the front of the PC.
It is possible to connect a receipt printer and a cash drawer with a pole display.
1. Connect the large end of the RS-232 connector marked RS-1 to RP-1 on the receipt printer. Connect the small end of the RS-232 cable marked RS-2 to the socket PC-1 on the PC.
2. Take the small RJ-12 connector marked RJ-1 from the cash drawer and connect to the port marked RP-2 on the receipt printer.
3. Finally connect the power supply lead - P-1, to the socket marked RP-3 on the receipt printer.
A printable document of the above with further images:
Hardware_Guide_ActinicEPOSv1.doc
* PC Upgrade till system
* Entry-level PC till system
You should have the items shown in the following picture:
For other EPOS hardware please consult the manufacturer�s literature for installation instructions.
Please note that this guide is for illustrative purposes only, location of connectors may vary. Please refer to manufacturer�s instructions for full details.
Do not connect any hardware to the mains until all the connections have been made.
Connecting the Pole Display
1. Connect the large end of one of the RS-232 cables � RS-1 to the matching connector on the pole display marked PD-3.
2. Connect the small end of the same RS-232 cables - RS-2 to the com port on the marked as PC-1 on the PC.
3. Connect the end of the power cable marked P-1 to the socket marked PD-1 on the pole display � do not connect to the mains at this point.
Connecting the Receipt Printer
1. Connect the large end of the remaining RS-232, (marked as RS-1) to the matching connector on the receipt printer shown as RP-1. Connect the small end of the same RS-232 cable marked as RS-2 to port PD-2 on the pole display.
2. Connect one end of the round power cable connector to the matching connector on the receipt printer, shown as RP-3.
3. Connect the other end of the round power cable to PD-4 on the pole display.
Connecting the Cash Drawer
1. Take the small RJ12 connector (RJ-1) from the cash drawer and connect to the port marked RP-2 on the receipt printer.
Connecting the USB �Keyboard Wedge� Scanner.
1. Connect the plug marked KS-1 from the scanner to a spare USB connector on the PC, shown as PC-2. Note there may be USB connectors located on the front of the PC.
It is possible to connect a receipt printer and a cash drawer with a pole display.
1. Connect the large end of the RS-232 connector marked RS-1 to RP-1 on the receipt printer. Connect the small end of the RS-232 cable marked RS-2 to the socket PC-1 on the PC.
2. Take the small RJ-12 connector marked RJ-1 from the cash drawer and connect to the port marked RP-2 on the receipt printer.
3. Finally connect the power supply lead - P-1, to the socket marked RP-3 on the receipt printer.
A printable document of the above with further images:
Hardware_Guide_ActinicEPOSv1.doc