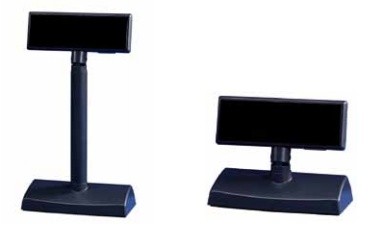
Please see instructions below to configure the GIGATEK DSP840 Customer pole display to work with SellerDeck EPOS:
First, you need to change some of its Dip Switch settings on the pole display in order to work correctly with SellerDeck Epos
Please see instructions below:
1) Turn off any power to the Customer Display and remove the top part so you only have the Head of the Display.
2) Locate the small cover on the underneath of the Pole Display Head.
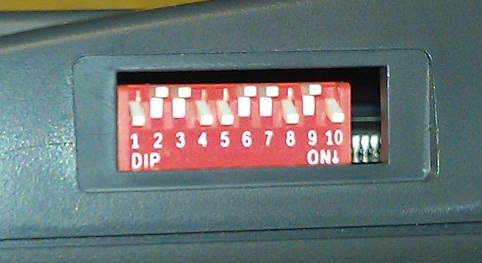
3) Remove the cover carefully and you will now see the Dip Switches.
4) Now alter the switches as to the correct format listed underneath.
Switch Position
5) Replace the Dip Switch cover and connect the Display according to the User Manual.
6) Look at the base of the pole display, plug the small RJ-12 connector into the port marked "To DSP".

7) On the bottom of the pole display, plug the wider 25 pin end of the serial cable into the port marked "To host"
8) Plug the other smaller end of the serial cable into one of the Com ports on your computer.
9) On the bottom of the pole display, plug the power pack into the port marked "DV12V".
10) Finally, turn the power on for the pole display.
Now you need to configure the Pole Display to work with SellerDeck EPOS, see instructions below. These instructions should also work with any Pole Display, as long as it is Epson OPOS compatible:
11) On your computer, go to Start | Programs | OPOS | SetupPOS Ver2.00

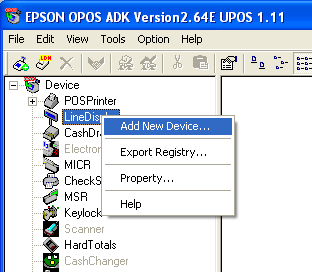
12) Expand the list of devices on the left, then expand "LineDisplay".
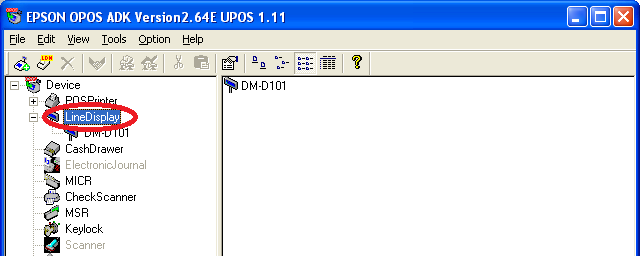
13) Delete "DM-D101" from the list of devices.
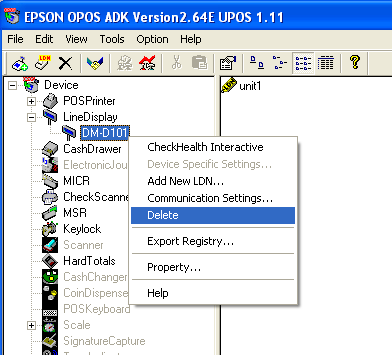
14) Right click on �LineDisplay� and select �add new device�
15) In the �Select Device name� drop down list select "DM-D210"
16) In �Add new LDN� type �unit1�
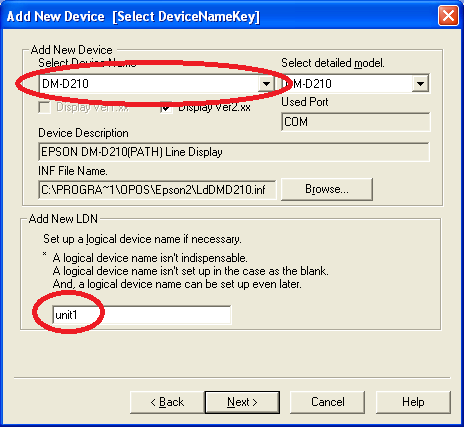
17) Click �Next�
18) Under "Com Port settings" you need to select the correct Com Port the pole display is plugged into on your PC. You can come back and try another COM port if the test later on does not work. Click here to check what COM ports you have avalible on your PC.
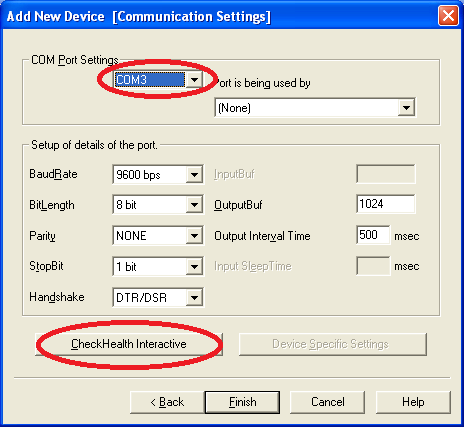
19) You can test if you have selected the correct port by clicking "Checkhealth Interactive", then click "Start", it will then show a test message on your pole display. If it does, you�re done!
19) Click "Finish"
21) In SellerDeck EPOS, go to Setup | This till | "Printing" tab, and make sure the tick boxes "Epson OPOS avalible" and "Customer Display Active" is ticked and a message has been entered in "Customer Display Message". (Note, this message only appears when you go to the sales screen, and press the "Lock" button.)
Click Here to begin setting up the printer
First, you need to change some of its Dip Switch settings on the pole display in order to work correctly with SellerDeck Epos
Please see instructions below:
1) Turn off any power to the Customer Display and remove the top part so you only have the Head of the Display.
2) Locate the small cover on the underneath of the Pole Display Head.
3) Remove the cover carefully and you will now see the Dip Switches.
4) Now alter the switches as to the correct format listed underneath.
Switch Position
- | On
- | Off
- | Off
- | On
- | On
- | Off
- | Off
- | On
- | Off
- | On
5) Replace the Dip Switch cover and connect the Display according to the User Manual.
6) Look at the base of the pole display, plug the small RJ-12 connector into the port marked "To DSP".
7) On the bottom of the pole display, plug the wider 25 pin end of the serial cable into the port marked "To host"
8) Plug the other smaller end of the serial cable into one of the Com ports on your computer.
9) On the bottom of the pole display, plug the power pack into the port marked "DV12V".
10) Finally, turn the power on for the pole display.
Now you need to configure the Pole Display to work with SellerDeck EPOS, see instructions below. These instructions should also work with any Pole Display, as long as it is Epson OPOS compatible:
11) On your computer, go to Start | Programs | OPOS | SetupPOS Ver2.00
12) Expand the list of devices on the left, then expand "LineDisplay".
13) Delete "DM-D101" from the list of devices.
14) Right click on �LineDisplay� and select �add new device�
15) In the �Select Device name� drop down list select "DM-D210"
16) In �Add new LDN� type �unit1�
17) Click �Next�
18) Under "Com Port settings" you need to select the correct Com Port the pole display is plugged into on your PC. You can come back and try another COM port if the test later on does not work. Click here to check what COM ports you have avalible on your PC.
19) You can test if you have selected the correct port by clicking "Checkhealth Interactive", then click "Start", it will then show a test message on your pole display. If it does, you�re done!
19) Click "Finish"
21) In SellerDeck EPOS, go to Setup | This till | "Printing" tab, and make sure the tick boxes "Epson OPOS avalible" and "Customer Display Active" is ticked and a message has been entered in "Customer Display Message". (Note, this message only appears when you go to the sales screen, and press the "Lock" button.)
Click Here to begin setting up the printer