This trick will add a 'gift wrapping' product to your store, and include a link to that product in the shopping cart, so people can add it to their order.
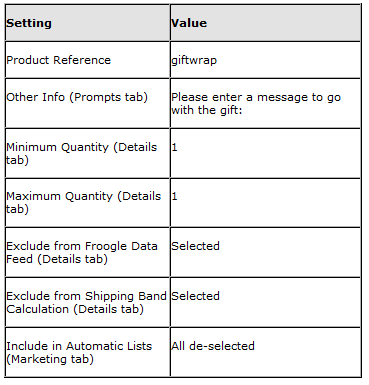
To begin, you need to create the giftwrapping product in your store. Create the product in an appropriate location (e.g. a new section called 'Gift Wrapping') and use the following settings:

If you are automatically generating product reference numbers, you will not be able to enter a product reference of 'giftwrap'. You'll just need to make a note of the product reference assigned to the product.
Next, you need to create a new layout for the shopping cart. To do this:
1. Go to 'Design | Library | Layouts'.
2. Expand the 'Checkout Area' group.
3. Right-click within the group and select 'New Layout'.
4. Give it a name of 'Giftwrap' and click 'OK'.
5. Double-click on the layout to edit it and copy and paste the following code into the layout:
<!-- Gift Wrap list begin-->
<tablecellspacing="2" cellpadding="3" border="0" width="<actinic:variable name="ACTSTDWIDTH" />">
<tr>
<th align="left" class="cartheading"><strong>Gift Wrap:</strong></th>
</tr>
<tr>
<td class="cart">
<ul>
<li>
<a href="<actinic:variable name="SearchCGIURL" />?PRODREF=giftwrap&NOLOGIN=1<actinic:block if="%3cactinic%3avariable%20name%3d%22HiddenFields%22%20%2f%3e%20%21%3d%20%22%22">&SHOP=<Actinic:Variable Name="HiddenFields"/></actinic:block>"> Please click here to add Gift Wrapping to your Order</a>
</li>
</ul>
</td>
</tr>
</table>
<!-- Gift Wrap list end-->
Change PRODREF=giftwrap so "giftwrap" is the product reference of the giftwrap product.
Click 'OK' to save the changes to the layout.
Finally, you need to include the giftwrap layout into shopping cart layout.
The easiest way to do this is go to the 'Shopping Cart Table' group in the library and editing 'View Cart Page Shopping Cart Grid'.
Add the following code in where required.
<actinic:variable name="CheckoutArea" value="Giftwrap" />
It may take a few goes before you are happy with the placement, but you can check the results in the previw panel in the 'Design' tab.
To begin, you need to create the giftwrapping product in your store. Create the product in an appropriate location (e.g. a new section called 'Gift Wrapping') and use the following settings:
If you are automatically generating product reference numbers, you will not be able to enter a product reference of 'giftwrap'. You'll just need to make a note of the product reference assigned to the product.
Next, you need to create a new layout for the shopping cart. To do this:
1. Go to 'Design | Library | Layouts'.
2. Expand the 'Checkout Area' group.
3. Right-click within the group and select 'New Layout'.
4. Give it a name of 'Giftwrap' and click 'OK'.
5. Double-click on the layout to edit it and copy and paste the following code into the layout:
<!-- Gift Wrap list begin-->
<tablecellspacing="2" cellpadding="3" border="0" width="<actinic:variable name="ACTSTDWIDTH" />">
<tr>
<th align="left" class="cartheading"><strong>Gift Wrap:</strong></th>
</tr>
<tr>
<td class="cart">
<ul>
<li>
<a href="<actinic:variable name="SearchCGIURL" />?PRODREF=giftwrap&NOLOGIN=1<actinic:block if="%3cactinic%3avariable%20name%3d%22HiddenFields%22%20%2f%3e%20%21%3d%20%22%22">&SHOP=<Actinic:Variable Name="HiddenFields"/></actinic:block>"> Please click here to add Gift Wrapping to your Order</a>
</li>
</ul>
</td>
</tr>
</table>
<!-- Gift Wrap list end-->
Change PRODREF=giftwrap so "giftwrap" is the product reference of the giftwrap product.
Click 'OK' to save the changes to the layout.
Finally, you need to include the giftwrap layout into shopping cart layout.
The easiest way to do this is go to the 'Shopping Cart Table' group in the library and editing 'View Cart Page Shopping Cart Grid'.
Add the following code in where required.
<actinic:variable name="CheckoutArea" value="Giftwrap" />
It may take a few goes before you are happy with the placement, but you can check the results in the previw panel in the 'Design' tab.