IMPORTANT NOTE: If upgrading to v18.2.3. or later, it is essential that you process and complete any outstanding orders before upgrading. A number of payment methods have been removed in this version and will not be available to complete orders afterwards.
Installing a New Version
The best way to upgrade to a new version of SellerDeck is to install the software and then import your site snapshot into it to upgrade.
To download the latest version of SellerDeck, go to: http://portal.sellerdeck.co.uk/index...merce-software
Older versions of SellerDeck can be found here: http://portal.sellerdeck.co.uk/index...tegory/archive
Instructions to upgrade SellerDeck:
- Install the new version of SellerDeck onto your PC (any other versions of SellerDeck will need to be closed).
- SellerDeck Desktop 2016 or version 18 require certain third party files to be installed to operate correctly.
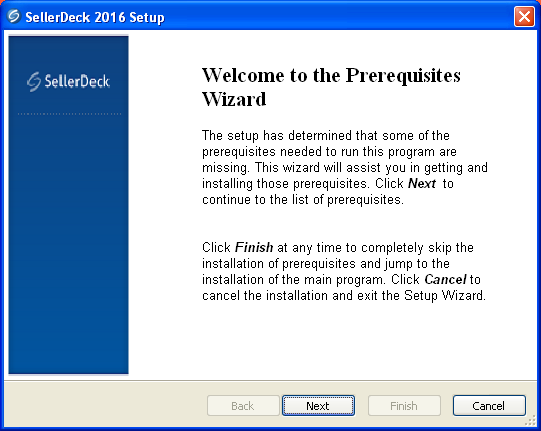
- The installer will check whether these files already exist and if not will present the 'Prerequisites' wizard: -

- Click 'Next' to be taken to the SellerDeck licence agreement which must be accepted to continue.
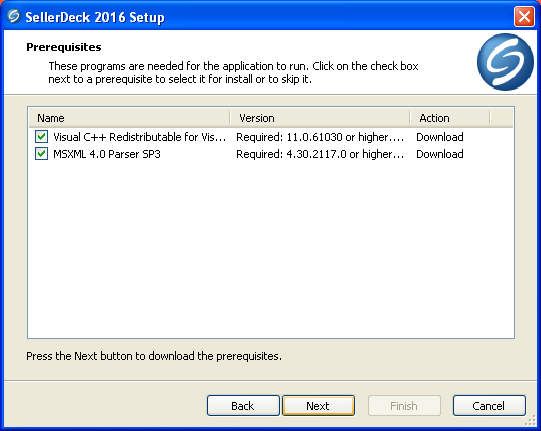
- Once you have clicked 'Next' a window will be displayed giving details of the files that the installer has determined that the software requires to operate:-

- Click 'Next' and the files will be downloaded and installed.
Note: You may be required to accept licence agreements to install the third party files.
After this you will have the ACE driver installer run if this has been selected.
If you encounter an error when installing 2016, this might be because you have selected to install ACE drivers, see the article here: -
http://community.sellerdeck.com/showthread.php?t=56414
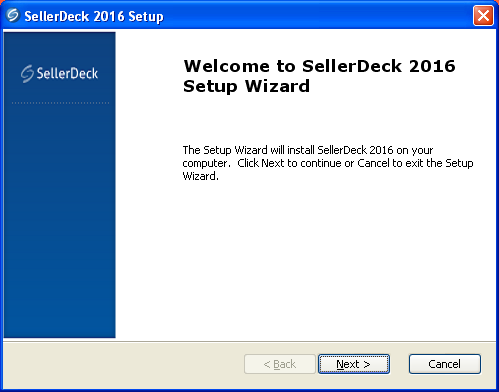
- Once this has been completed, the SellerDeck 2016 Setup wizard will be displayed: -

- Click 'Next' through the wizard selecting any options that you require until the wizard has completed.
Open your new software and licence it.
You can see the release notes for the software by going to the program group for 'SellerDeck 2016' or 'Sellerdeck v18' and clicking on 'Release Notes', this will open a browser and display the notes.
This will give details on changes within the software and bugs that have been fixed from previous versions.
Now go to the section 'Once SellerDeck is installed:'.
Versions up to and including SellerDeck 2014
If you are upgrading to SellerDeck 2014, and are using Realex as a payment gateway, see this knowledgebase article before going further: http://community.sellerdeck.com/showthread.php?t=55828
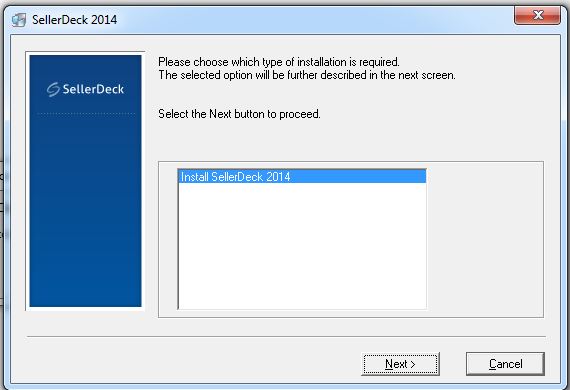
- During the wizard you will be prompted with the following box:
- Select 'Install [Version number]', then click "Next". This will install a new clean default SellerDeck site on your PC.
This means that you can have more than one version of SellerDeck running on the PC. (For Example, version 10 and 11). This also means that if upgrading your site has caused any major issues, you have the previous version to fall back on.
You will also have the chance and the opportunity to learn the new features before starting the upgrade process.
- Open SellerDeck.
- You will be prompted to enter a licence key, enter it if you have been provided with one. If you need to order a licence key upgrade, please follow the steps below:
If you have a current Cover Contract, then you can request your new licence key by logging into your billing control panel at http://myaccount.sellerdeck.co.uk/.
To login, enter the email address registered to your account and your password. If you have forgotten your password, please use the provided link to request a new one. The email address for "My Account" is usually the one associated with your SellerDeck invoices. If you still cannot login, please contact SellerDeck Administration on 0845 129 4888 (Calls cost 2p per minute plus your phone company's access charge) for assistance.
Once logged in, go to ‘My Licences’ | under the column ‘Cover Contract’ click your contract number (starting with EX).
Once you click ‘Upgrade’ the request will be sent to SellerDeck.
If you also use SellerDeck Link for Sage 50, you can also upgrade your “Link for Sage” licence key within the “Licences” area of My Account in the same way.”
Once SellerDeck is installed:
- Go to the version of SellerDeck you are upgrading from.
- Open up the site (or each site in turn, if you have more than one)
- Go to 'Settings | Business Settings | Ordering' and change 'Allowed' to 'Suspended'.
 - to -
- Publish the changes to the Web.
This will stop anyone from ordering anything off of the site while you are upgrading. The reason for this is because newer versions of SellerDeck cannot download orders from older versions of SellerDeck. This will replace all your 'Add to Cart' buttons with a message saying 'CATALOG SUSPENDED'.
Note: You can edit the text of the 'CATALOG SUSPENDED' message in 'Design | Text | Website Continued | General Information'
- Download Orders, leave your site a further 15 minutes and download orders again (this is to make sure you have downloaded all orders and payments)
- Create a snapshot once the publish has finished. Go to 'File | Snapshot | Export Site'. Save this to your desktop (or another area you can get to easily).
- Open the new version of SellerDeck.
- Go to 'File | Snapshot | Import Site' and choose the snapshot you have just created from the older version.
What you will see when upgrading:
You will see a message about upgrading your database and then you'll see a message that says 'Your design layouts have been upgraded'. During this process, your layouts will be upgraded by an upgrade engine; this will the correct part of your layout and automatically add the new code in.
v6/v7 customers will be offered the chance of using a default design at this point. This is a good idea to consider if your store has been heavily customised. If you had your store design created for you, it might be a good idea to talk to your designer before upgrading.
After this, a 'Site Upgrade' procedure will occur, during this SellerDeck copies in all the new Perl scripts it requires. All of your old scripts will be backed up within the 'SellerDeck vx\SiteUpgrade' folder within your installation directory.
(Where 'Vx' is the version you are upgrading to).
PLEASE NOTE: This is only relevant if you are upgrading to a version prior to v9.0.4 as from this version forward, all of the script changes are included within the software.
New for SellerDeck 2013 and above:
At the end of the upgrade process you may see a warning "There were some problems upgrading your design layouts." This knowledge base explains how to check what the warnings are:
http://community.sellerdeck.com/showthread.php?t=53563
New for SellerDeck 2014 and above:
It offers to upgrade your layouts, this is dependent on if you want to upgrade to the responsive layouts and for these to be implemented, if you would like to switch to the responsive theme press ‘Yes’, if otherwise press ‘No’.
Testing Your Site:
Once your site is in the new version of SellerDeck, we recommend that you switch SellerDeck into TEST MODE. This means that you can test that your site works correctly online, and looks good, before overriding your live site.
To do this:
- Go to ‘Web | Switch to Test Mode’
This will create a sub-directory on your hosting server and will publish to this. This will NOT touch your live site.
- Go to ‘Web | Refresh Website’ (this is important, publish to web will not do everything necessary for the upgrade).
Your domain name will now be different. Please go to Web | Network Setup and get the Website URL (this will be different from your live site).
Paste this new URL into a web browser to see the test site. You can use this site as if it is the live site.
What to Test / Look for:
The first thing to check is the design. You will be able to see any obvious issues with your design. If there are problems with the design, you can go to the library and see at a glance the layouts that have been changed by the upgrade.
- Go to 'Design | Library' and select the box labelled 'Highlight new or edited layouts that have been recently upgraded'.
- SellerDeck will highlight the group containing the highlighted layouts, as well as the layouts themselves.
- If you come across a layout that's marked as upgraded, right click on it and select 'Compare with Previous Version'.
Test the following:
- Adding to cart
- Searching for products
- Customer login (if you have customer accounts)
- Placing and downloading orders
- If you are using a Payment Service we suggest you create a tiny test product (i.e. 0.01 in value) and place a live order for that product so you can absolutely be sure the integration is still working.
Once you are happy that the site is working correctly:
- Go to’ Web | Switch to Production Mode’.
This will then come up with the following warning.

This means the sub-domain on your hosting server will now be removed. It will NOT remove any changes you made in the SellerDeck software.
- Click Continue.
Updating the site online to the new version.
Make sure that the site is in production mode, and that you allow ordering again.
- Go to Settings | Business Settings | Ordering and change Suspended to Allowed.
 - to -
- Go to ‘Web | Refresh Website’ (this is important, publish to web will not do everything necessary for the upgrade).
Installing a New Version
The best way to upgrade to a new version of SellerDeck is to install the software and then import your site snapshot into it to upgrade.
To download the latest version of SellerDeck, go to: http://portal.sellerdeck.co.uk/index...merce-software
Older versions of SellerDeck can be found here: http://portal.sellerdeck.co.uk/index...tegory/archive
Instructions to upgrade SellerDeck:
- Install the new version of SellerDeck onto your PC (any other versions of SellerDeck will need to be closed).
- SellerDeck Desktop 2016 or version 18 require certain third party files to be installed to operate correctly.
- The installer will check whether these files already exist and if not will present the 'Prerequisites' wizard: -
- Click 'Next' to be taken to the SellerDeck licence agreement which must be accepted to continue.
- Once you have clicked 'Next' a window will be displayed giving details of the files that the installer has determined that the software requires to operate:-
- Click 'Next' and the files will be downloaded and installed.
Note: You may be required to accept licence agreements to install the third party files.
After this you will have the ACE driver installer run if this has been selected.
If you encounter an error when installing 2016, this might be because you have selected to install ACE drivers, see the article here: -
http://community.sellerdeck.com/showthread.php?t=56414
- Once this has been completed, the SellerDeck 2016 Setup wizard will be displayed: -
- Click 'Next' through the wizard selecting any options that you require until the wizard has completed.
Open your new software and licence it.
You can see the release notes for the software by going to the program group for 'SellerDeck 2016' or 'Sellerdeck v18' and clicking on 'Release Notes', this will open a browser and display the notes.
This will give details on changes within the software and bugs that have been fixed from previous versions.
Now go to the section 'Once SellerDeck is installed:'.
Versions up to and including SellerDeck 2014
If you are upgrading to SellerDeck 2014, and are using Realex as a payment gateway, see this knowledgebase article before going further: http://community.sellerdeck.com/showthread.php?t=55828
- During the wizard you will be prompted with the following box:
- Select 'Install [Version number]', then click "Next". This will install a new clean default SellerDeck site on your PC.
This means that you can have more than one version of SellerDeck running on the PC. (For Example, version 10 and 11). This also means that if upgrading your site has caused any major issues, you have the previous version to fall back on.
You will also have the chance and the opportunity to learn the new features before starting the upgrade process.
- Open SellerDeck.
- You will be prompted to enter a licence key, enter it if you have been provided with one. If you need to order a licence key upgrade, please follow the steps below:
If you have a current Cover Contract, then you can request your new licence key by logging into your billing control panel at http://myaccount.sellerdeck.co.uk/.
To login, enter the email address registered to your account and your password. If you have forgotten your password, please use the provided link to request a new one. The email address for "My Account" is usually the one associated with your SellerDeck invoices. If you still cannot login, please contact SellerDeck Administration on 0845 129 4888 (Calls cost 2p per minute plus your phone company's access charge) for assistance.
Once logged in, go to ‘My Licences’ | under the column ‘Cover Contract’ click your contract number (starting with EX).
Once you click ‘Upgrade’ the request will be sent to SellerDeck.
If you also use SellerDeck Link for Sage 50, you can also upgrade your “Link for Sage” licence key within the “Licences” area of My Account in the same way.”
Once SellerDeck is installed:
- Go to the version of SellerDeck you are upgrading from.
- Open up the site (or each site in turn, if you have more than one)
- Go to 'Settings | Business Settings | Ordering' and change 'Allowed' to 'Suspended'.
- Publish the changes to the Web.
This will stop anyone from ordering anything off of the site while you are upgrading. The reason for this is because newer versions of SellerDeck cannot download orders from older versions of SellerDeck. This will replace all your 'Add to Cart' buttons with a message saying 'CATALOG SUSPENDED'.
Note: You can edit the text of the 'CATALOG SUSPENDED' message in 'Design | Text | Website Continued | General Information'
- Download Orders, leave your site a further 15 minutes and download orders again (this is to make sure you have downloaded all orders and payments)
- Create a snapshot once the publish has finished. Go to 'File | Snapshot | Export Site'. Save this to your desktop (or another area you can get to easily).
- Open the new version of SellerDeck.
- Go to 'File | Snapshot | Import Site' and choose the snapshot you have just created from the older version.
What you will see when upgrading:
You will see a message about upgrading your database and then you'll see a message that says 'Your design layouts have been upgraded'. During this process, your layouts will be upgraded by an upgrade engine; this will the correct part of your layout and automatically add the new code in.
v6/v7 customers will be offered the chance of using a default design at this point. This is a good idea to consider if your store has been heavily customised. If you had your store design created for you, it might be a good idea to talk to your designer before upgrading.
After this, a 'Site Upgrade' procedure will occur, during this SellerDeck copies in all the new Perl scripts it requires. All of your old scripts will be backed up within the 'SellerDeck vx\SiteUpgrade' folder within your installation directory.
(Where 'Vx' is the version you are upgrading to).
PLEASE NOTE: This is only relevant if you are upgrading to a version prior to v9.0.4 as from this version forward, all of the script changes are included within the software.
New for SellerDeck 2013 and above:
At the end of the upgrade process you may see a warning "There were some problems upgrading your design layouts." This knowledge base explains how to check what the warnings are:
http://community.sellerdeck.com/showthread.php?t=53563
New for SellerDeck 2014 and above:
It offers to upgrade your layouts, this is dependent on if you want to upgrade to the responsive layouts and for these to be implemented, if you would like to switch to the responsive theme press ‘Yes’, if otherwise press ‘No’.
Testing Your Site:
Once your site is in the new version of SellerDeck, we recommend that you switch SellerDeck into TEST MODE. This means that you can test that your site works correctly online, and looks good, before overriding your live site.
To do this:
- Go to ‘Web | Switch to Test Mode’
This will create a sub-directory on your hosting server and will publish to this. This will NOT touch your live site.
- Go to ‘Web | Refresh Website’ (this is important, publish to web will not do everything necessary for the upgrade).
Your domain name will now be different. Please go to Web | Network Setup and get the Website URL (this will be different from your live site).
Paste this new URL into a web browser to see the test site. You can use this site as if it is the live site.
What to Test / Look for:
The first thing to check is the design. You will be able to see any obvious issues with your design. If there are problems with the design, you can go to the library and see at a glance the layouts that have been changed by the upgrade.
- Go to 'Design | Library' and select the box labelled 'Highlight new or edited layouts that have been recently upgraded'.
- SellerDeck will highlight the group containing the highlighted layouts, as well as the layouts themselves.
- If you come across a layout that's marked as upgraded, right click on it and select 'Compare with Previous Version'.
Test the following:
- Adding to cart
- Searching for products
- Customer login (if you have customer accounts)
- Placing and downloading orders
- If you are using a Payment Service we suggest you create a tiny test product (i.e. 0.01 in value) and place a live order for that product so you can absolutely be sure the integration is still working.
Once you are happy that the site is working correctly:
- Go to’ Web | Switch to Production Mode’.
This will then come up with the following warning.
This means the sub-domain on your hosting server will now be removed. It will NOT remove any changes you made in the SellerDeck software.
- Click Continue.
Updating the site online to the new version.
Make sure that the site is in production mode, and that you allow ordering again.
- Go to Settings | Business Settings | Ordering and change Suspended to Allowed.
- Go to ‘Web | Refresh Website’ (this is important, publish to web will not do everything necessary for the upgrade).